Wednesday, August 25, 2010

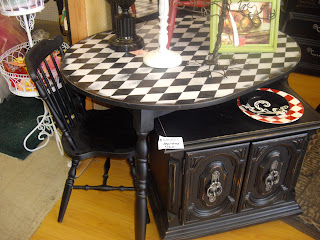
Fun HArlequin End Table $60. SOLD


BEFORE: I love the lines on this table, it kinda flirts with you. I wanted to try the Harlequin pattern on something a little smaller, so this time I covered the entire top with painters tape, and then drew the pattern on, after, I removed the diamonds that I wanted to be white, and painted them. You'll need to let the paint dry completely before you remove the tape to avoid getting paint on the black diamonds. After you leave the paint to set completely, sand down the surface thoroughly more in some areas then others.


AFTER: I really like this Harlequin pattern even if it is hard and time consuming. It would work really well, in a play room, or even in a house that is not afraid to have a little fun! The drawer on here is just for looks, but it did add just a little bit of a whimsical touch. $60.00 SOLD

Tuesday, August 17, 2010

Harlequin Fun $150.00 SOLD

Today I refinished this Fun little game table. It was not the best thing to look at, but had so much potential!


After: It is so much fun now!! Cant you just hear it calling you to do a puzzle, or play a game of chess? All in all I have decided that harlequin patterns are not my favorite to do! It is extremely time consuming, but it is worth the time if you have the patience to do it!

This Table will be for sale on KSL.com till Thursday, then you can find it at Finders Keepers in American Fork $150.   ~~~~SOLD~~~

Sunday, August 15, 2010

A little touch of Character $200.00 SOLD

Before: It is a nice enough looking dresser, but it definitely need a bit of fixing, the drawers all stuck together as you tried to open one. You have to make sure that you sand down your dresser before you do any priming to make the surface smooth and to give the primer something to bond to.
After priming the first layer of black paint went on, then I made a stencil of the flowers that you will see here. Stencils are very easy to make, you can draw your own flowers or just print them off the internet. then cut them out on thick card stock or plastic, after placing the stencil in the places you would like the pattern to be, take your paint brush and dab the paint lightly over the stencil till you get the thickness that you want.
Here is the top, all I did here is tape off the edges and paint the center with the same paint as I used for the flowers, then sanded till I could sand no more!
And Voi La! The finished product! It will certainly add character to any room!
This Dresser is for Sale at the American Fork Finders Keepers. $200. SOLD~~

Antique? $160.00 Sold!


This lovely dresser is Adorable! I did a antiqued off white distressed finish on it. The first step was to sand the entire dresser down, then prime it. After letting the primer fully dry I gave it a coat of paint. It was just a little too perfect looking for such and old dresser I imagined how it would look if it had been used over the years, so that is ware the sanding came in. Then after sanding till my hand hurt I put crystal knobs on it and Voi La! I can imagine it in an entry way with a matching oval mirror above it welcoming people to set there keys, perhaps tidy themselves up a bit for there family. This dresser will also be for sale at the American Fork Finders Keepers. $160.

Time for the unusual $60.00 SOLD


My first refinishing job for Finders Keepers...This Beautiful and fun Pink end table has a distressed finish that will add character to any girls bedroom or living room! It makes me want to design a room for single college girls! This would be perfect with a tall large lamp next to a bright floral sofa. Or for a little baby girl's room, there are so many possibilities! It will be for sale at The American Fork Ut Finders Keepers On Wednesday(08/04/2010)!! SOLD!!!

On this Stormy August Day! $100.00 ONLY 1 LEFT!!


Rain or shine!! I love that my friend let me use her garage to refinish these! It was such a stormy day! These are cute little end tables that were just in need of a little character, and what a difference a little paint makes! While refinishing them it dawned on me that it they would make perfect little tea tables for little girls. My little girl is in love with tea time, and just adored sitting at one of these for a little while. I am going to be ambitious and try to make a couple chairs for one and see how popular it may get. One has already sold and I can just see how adorable her little girl will be with it! $100.

Saturday, August 14, 2010

Tab:Reupholstering

Hello!  I am so glad you popped by!  I am so happy to share this reupholstering job I just finished.  Now  I am still learning a few tricks of the trade, but it turned out so cute that I think I will keep reupholstering in my future.  This chair was a yard sale find of my friends, I believe it was 5.00!  It had a dated dirty green fabric on it.  Not that I have anything against this fabric, but it really was very dirty!

 No need to say it gave me great pleasure to remove all the fabric from the chair!


Phew!  That sounds like it was easy?  Hardly!  It felt like the staples would never end! 

Tip#1.
 Find a thin tipped flat screw driver, it worked even better than the staple remover! Keep a hammer with you for the stubborn staples. (by tapping the end of the screw driver with the hammer, the head of the screw driver will go under the staple easier). Also take a ton of pictures, that way you can use them if you need to remember how something was placed.
 Tip#2. 
 As you are removing the fabric write were you took it from (left to wing, right side under arm bottom) trust me this will help you in the end! Hence...
Tip#3.
DO NOT throw away the fabric you took off.  It will be your pattern. 
 Tip#4.
 Choose your fabric wisely.  Your fabric should be thick, and seat worthy.  If you are not sure of the fabric, ask an employee, they should be able to let you know. Now, lay your fabric out on a large flat area. (we used the entire living room floor).  Keep the pattern facing upward.  Lay the old fabric on top with its pattern facing up as well. 
 Tip#5.
  Be conscious of the way the pattern is facing, if you decided to use stripes, make sure when you place your pattern piece the stripes are facing the right way.  Now pin your pieces of old fabric (pattern) onto the new fabric (leave at least 2 in between each piece).  When you cut the pieces out, make sure to cut a little under an inch away from the pattern.  That way if you need a little extra to work with you have it (you don't want to come up short).
Tip#6.
before you throw away your pattern copy were you need to place your new pieces. (left wing, right side under arm bottom).  Now we are ready to get to business! If you have access to a compressor staple gun I would highly recommend it!  Now, just put everything back they way you took it off. 
Tip#7
Don't be afraid to use a little hot glue in the tricky eras. Or you can use fabric glue. 

Here is the finished project!


The legs are red to match the red in the flowers


Here is the side, She absolutely loves her new chair! 


So if you are going to attempt to reupholster anything, please feel free to ask me any questions!  I might know how to help! ;-)


Tab: Gallery

Refurbished Cream Hutch  $425.00 SOLD


Beautiful Cream Dresser $495.00 SOLD

Matching Night Stand $125.00 SOLD


Aqua Dresser $200.00 For Sale SOLD


Antique Drum Table.  For SALE  $150.00 $100.00 SOLD


Ethan Allen End Tables For Sale!!  $125. Each or $200. together! 
SOLD


Hand Painted Vanity 100. SOLD


Customer Refinish


Customer Refinish


Customer Refinish
See blog page for details on how we did this!


Customer Reupholster


Adorable Girls Tea Table For SALE!  $100.00

Tab: Welcome to new followers

WELCOME NEW FOLLOWERS!!
        I hope you find Skitt A Skatt Furniture fun, and helpful!  I am just one Email away from any furniture questions that you may have!   We would love to help with any "trash" that you see treasure in!!  Our monthly Give Aways will be announced the 1st of every month, so make sure to check in!   Click on our Give Aways tab to check out this months give away! Thanks for following! 

Felicia Sheridan

Tab Transformations

FURNITURE TRANSFORMATIONS!

Tab: About Me


Hi, I’m Felicia, welcome to my site!  I’m a wife to my amazing man, a mother to two adorable children, and we are living in Utah's beautiful mountain range.  I love transforming trash into treasure! Hence the name Skitt A Skatt (Norwegian for trash to treasure). I LOVE power tools, paint, and seeing something rejected made beautiful.  I demonstrate that the beautiful, welcoming "Picture in a Magazine" house that you know is too expensive, is easy and affordable!
I believe your house is a safe haven, a place that you should desire to be, and other people should feel comfortable and relaxed in. I will show you that quality can be found in "old". I love finding deals, home crafts, and being a DIYer.  I shop yard sales, thrift stores, flea markets, antique stores, and ksl.com to find great pieces of furniture that have been rejected.  I am an advocate of anything greenif you already have something that works well, or if it can be fixed, use it. Yes you can go green without sacrificing style. This sight is meant to inspire you to DIY or to buy things that are money saving, and beautiful.  Skitt A Skatt does one of the 10 'RE's ....Revives, Refinishes, Refurbishes, Renews, Redesigns, Reconditions, Reupholsters, Refreshes, Revamps, and Restores. I believe that Jesus Christ is my Savior, and the work I put into the things I sell is done as though it was for Him personally. Hope you enjoy!